Desert Temple Safe Looting Procedure
Introduction
Understand the Trap Before Entering
A desert temple, also called a desert pyramid, contains a treasure chamber beneath its main floor. In a standard, untouched temple in modern Java and Bedrock Edition, four chests surround a central stone pressure plate. Beneath the chamber floor are nine TNT blocks. Stepping on the plate powers the trap, potentially destroying the loot and killing an unprepared player.
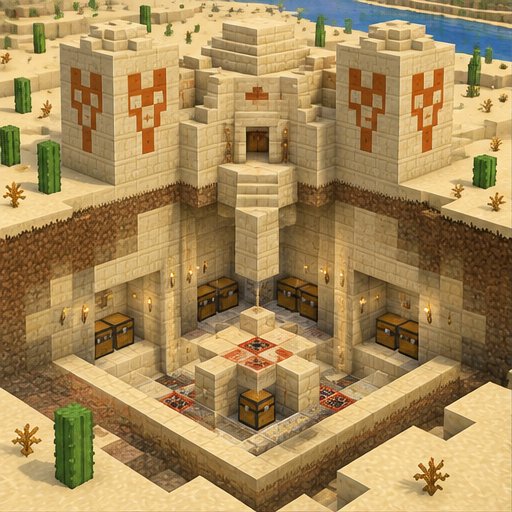
The colored terracotta pattern upstairs marks the area above the chamber. The central blue terracotta is not a safe entrance: breaking it and dropping through can land you on the pressure plate. Your goal is to descend beside the trap, remove its trigger from a safe position, and then recover the explosives before opening the chests.
Equipment and Preparation
Bring a pickaxe for sandstone, stone, and terracotta; a shovel for obstructing sand; torches; and a stack of ordinary solid building blocks. A water bucket is a useful emergency tool, but it is not a substitute for disarming the trap. Ladders are optional if you prefer a vertical access shaft. Carry food, a weapon, and enough inventory space for chest loot and recovered TNT.
You do not need shears or Silk Touch to recover unprimed TNT. It breaks by hand, although keeping an empty hand selected can help avoid accidentally using a dangerous item. Leave flint and steel, fire charges, and unnecessary redstone components out of your active hotbar during the operation.
In multiplayer, ask companions to wait upstairs until you confirm the chamber is safe. Previously visited temples may have missing floors, altered wiring, or additional traps. Custom maps, plugins, and structure-generation mods can also change the layout; the standard procedure assumes an ordinary generated temple.
Step-by-Step Safe Looting
Step 1: Secure the entrance and main room. Check corners and side spaces for hostile mobs, then place torches around your working area. Do not chase a mob across an exposed shaft. If the colored floor is already broken, stop at the edge and inspect it before proceeding.
Step 2: Locate the blue center tile and plan an offset descent. Preserve the center while opening a small inspection hole beside it. Stand on intact blocks while mining and look downward for the chamber, pressure plate, and chest positions. Do not assume an offset hole has a floor immediately underneath it.
Step 3: Dig a descending staircase through the sandstone beside the central shaft. Mine the next step from secure footing, checking each opening before moving forward. Keep the route aimed toward the outside edge of the treasure room rather than its center. If your next block opens into empty space, stop; extend a controlled staircase or use ladders attached to an intact shaft wall instead of jumping.
Step 4: Reach the chamber at its perimeter. Before stepping out, identify the pressure plate visually and establish a stable landing clear of it. Light the room from your access opening when possible. If a mob is present, remain behind cover rather than entering while it can move onto the trigger. Stone pressure plates respond to players and mobs; unlike wooden plates, they are not activated by dropped item entities.
Step 5: Break the stone pressure plate while standing off-center. Move only along visibly intact perimeter floor blocks until it is within reach. Aim at the thin plate itself, not the block supporting it. Confirm that the plate has disappeared before crossing the middle. Opening the standard temple chests does not trigger this trap; the plate is the normal trigger.
Step 6: Remove the TNT. Once the plate is gone, open the central floor carefully to expose the explosive layer. Recover the TNT blocks by mining them normally, working from secure edges and avoiding any ignition source. An untouched standard trap contains nine TNT blocks in a three-by-three arrangement. If blocks are missing or extra wiring appears, investigate rather than assuming the room follows the normal layout.
Step 7: Repair the floor and loot all four chests. Fill or cover the exposed pit with your building blocks so movement is straightforward. Chest contents are randomized and can vary with edition and version; no particular valuable item is guaranteed. Use your staircase or ladder route to leave rather than improvising a jump or pillar over the former trap.
Troubleshooting and Emergency Decisions
If you hear TNT hiss or see it flashing, breaking the pressure plate will not stop explosives that are already primed. Retreat immediately along your prepared route and put distance and solid terrain between yourself and the chamber. Do not remain to collect loot or try to mine primed TNT. Water can reduce explosion damage to surrounding blocks in some circumstances, but it does not make a player in the blast safe.
If falling sand obstructs your approach, clear it from a protected position before continuing. Never stand beneath an unsupported sand column. If the descent feels unsafe, close the opening temporarily and make a longer staircase from farther outside the shaft.
Version Notes and Optional Archaeology
In Java and Bedrock versions with the archaeology features introduced in 1.20, desert pyramids can also contain suspicious sand and a separate buried archaeology area. Bring a brush if you want to investigate these deposits. Brush suspicious sand in place rather than mining it, and avoid removing its support: falling suspicious sand can lose its archaeological contents.
Disarm the treasure chamber before undertaking extensive excavation nearby. Where custom generation makes the layout uncertain, the sensible alternative is slow perimeter excavation with a maintained escape route, treating every newly exposed plate, wire, and explosive as an unknown hazard.
Please support us by visiting one of our partners: Amazon